
The Tech Provider program is an innovative partnership model that enables platforms and Multimedia Aplicada to deliver a robust WhatsApp solution. In this model, platforms act as a WhatsApp service providers, while Multimedia Aplicada (as a Solution Partner) manages WhatsApp messaging services, including everything from the initial setup and onboarding to the continuous maintenance and support.
This page provides a guide to the integration process for Tech Providers using WhatsApp Business Platform solutions with Infobip. It outlines the key business and technical steps involved in the integration.
The setup phase includes:
The integration phase includes:
After completing the integration steps, you can proceed with final testing and launch with your end customers.
To get started, you can either create a new business portfolio (opens in a new tab) or review and update your existing one to include all the required business details, such as business address, website, and email. Ensure that the account creator or owner can provide accurate information about the business during the business verification process later.
Things to keep in mind:
To create a new business app and connect it to your business portfolio, navigate to My Apps (opens in a new tab) panel and select Create app. Then choose your business portfolio to connect the app with it.
Alternatively, use an existing business app that is already linked to your business portfolio. Load the existing app in the App Dashboard and skip to the step to add the WhatsApp product.
If you create an app and do not see the option to create a business app, first select Other > Next.
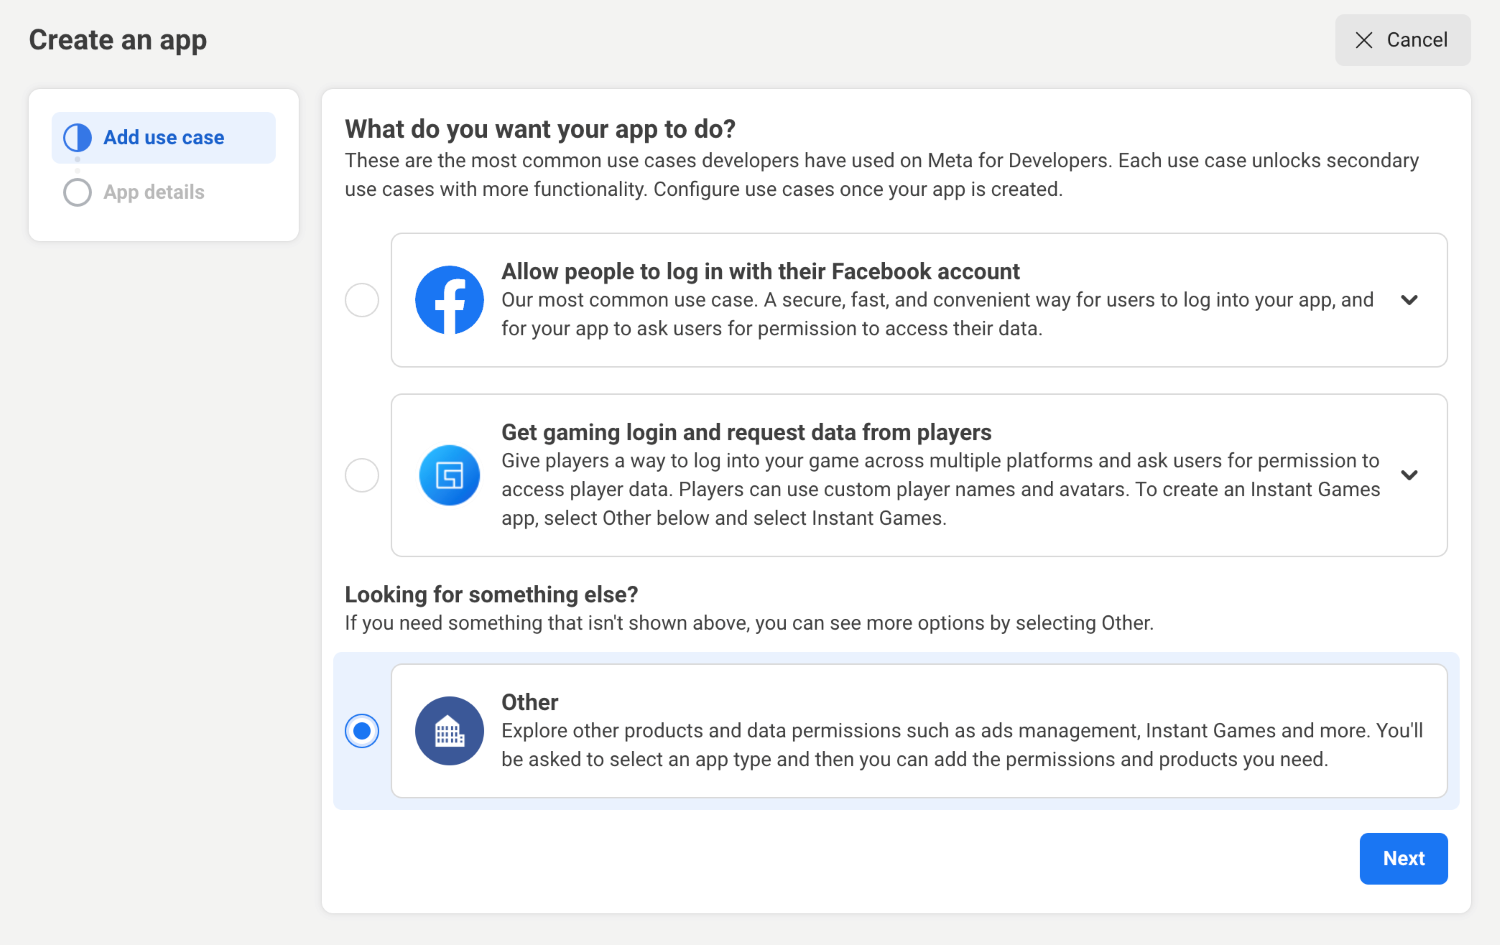
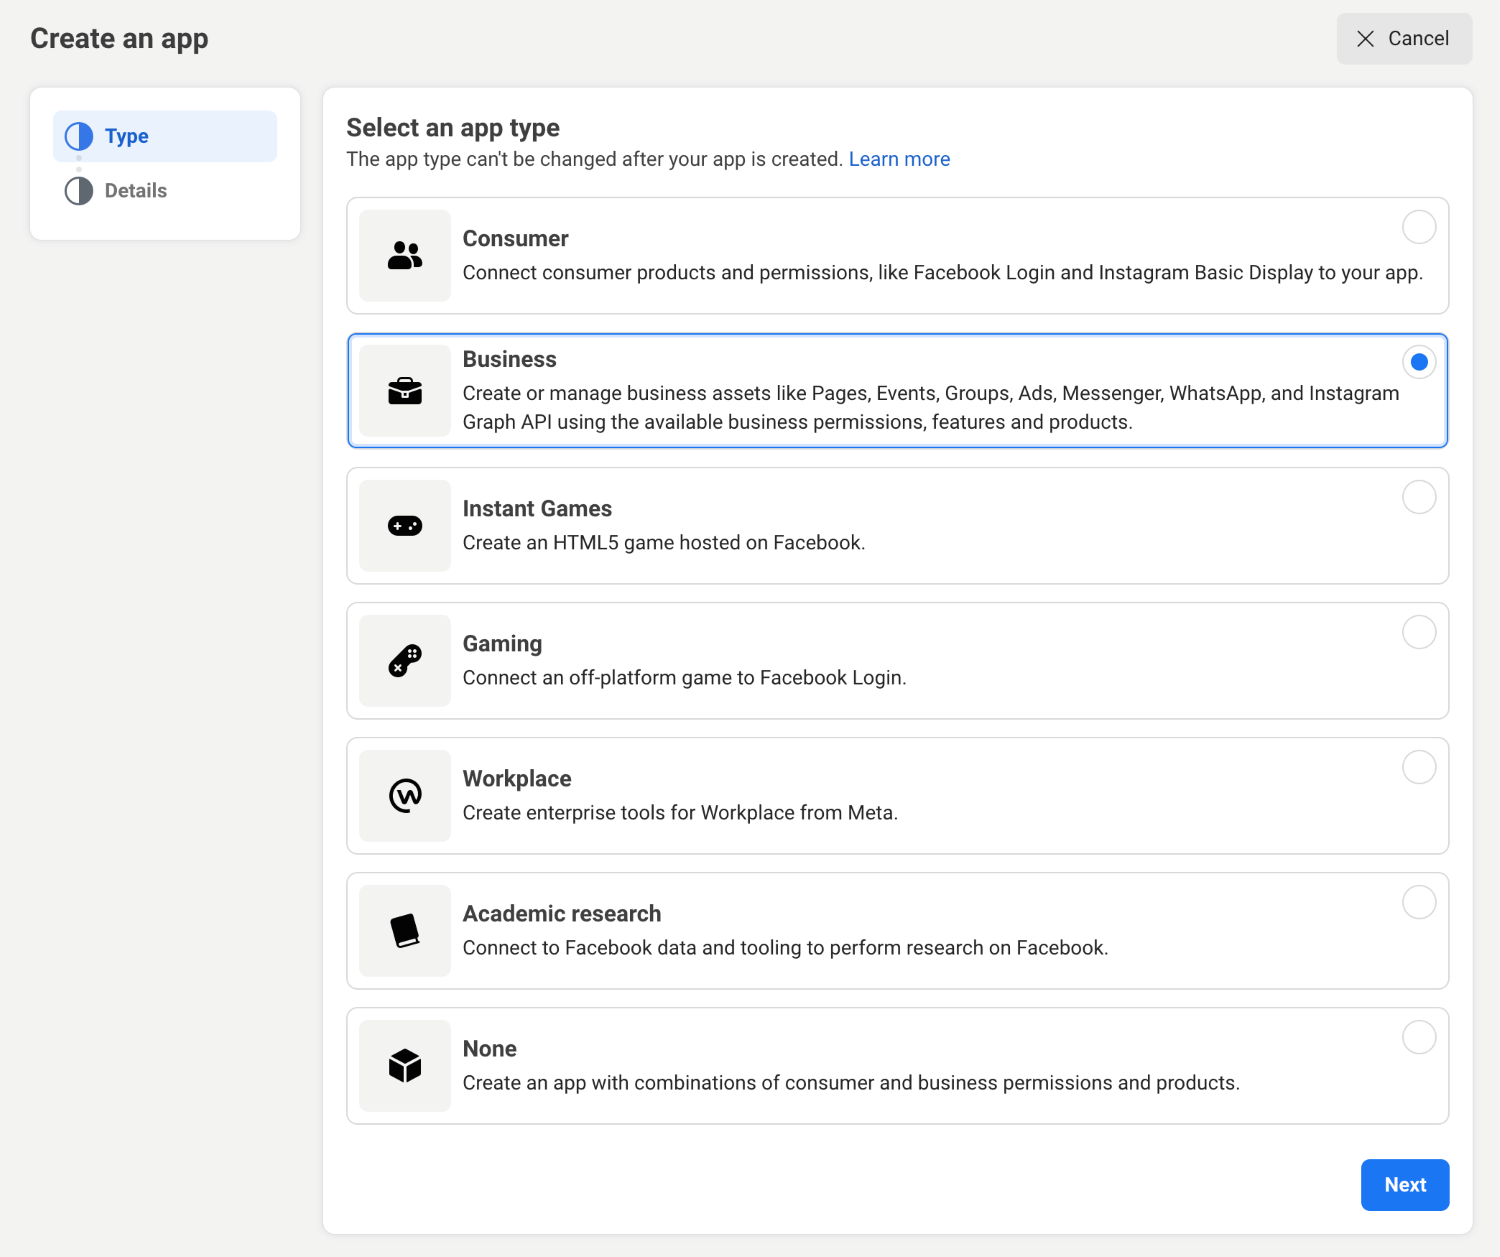
Select Business and complete the rest of the form.
If you cannot complete this step, try selecting No business portfolio selected on the Business portfolio dropdown.
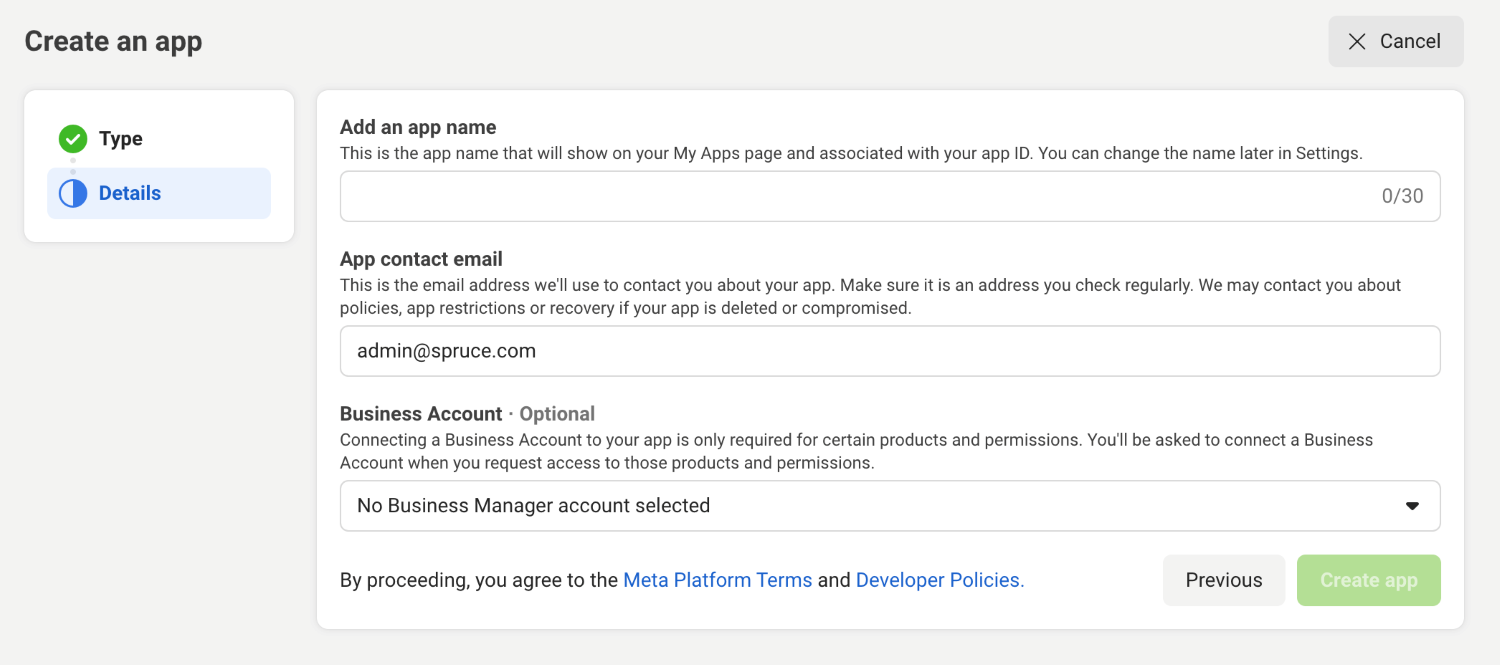
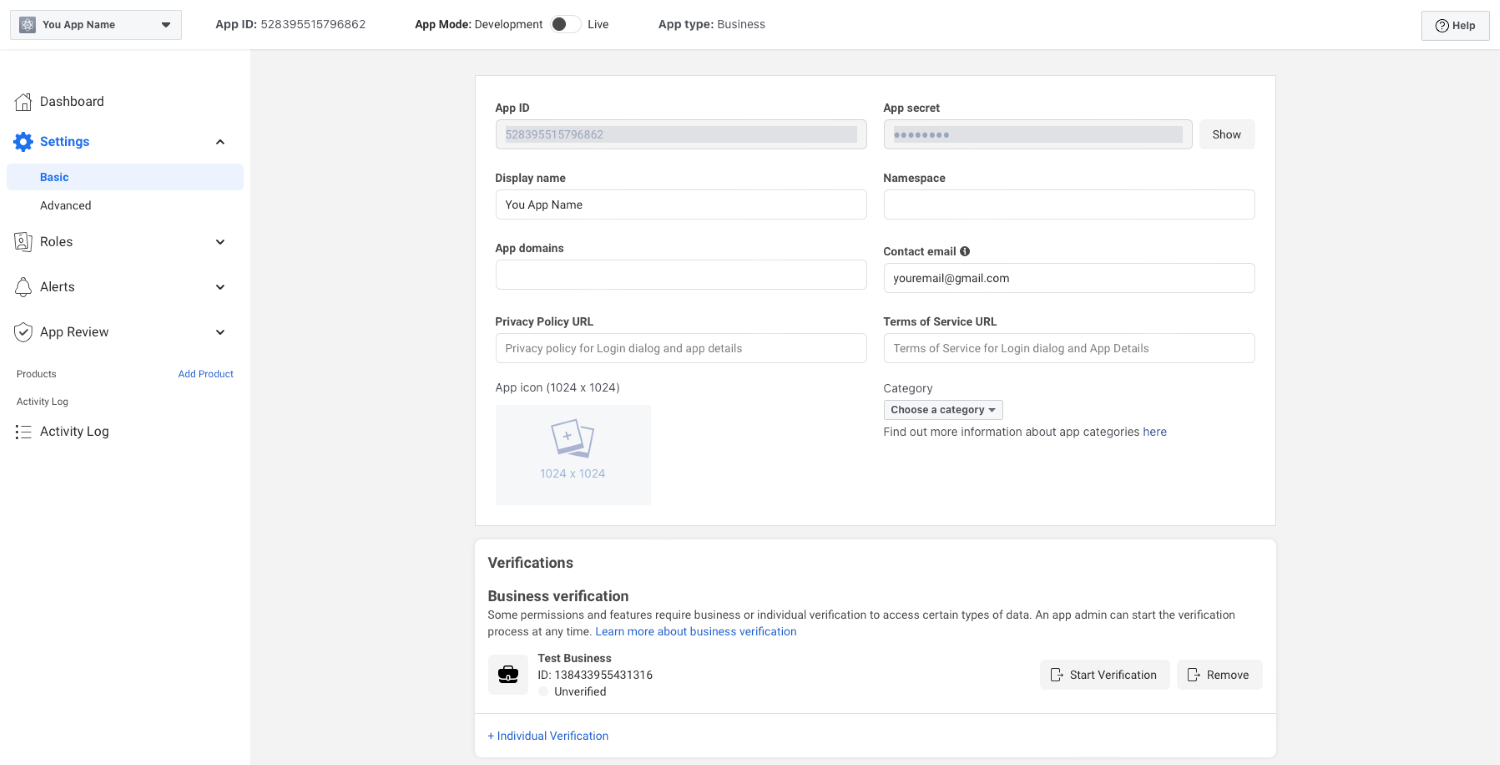
Once the app is created, navigate to your app under the Settings > Basic tab and update your display name, domains, contact email and icon. Add your privacy policy and terms of service URLs, which will be visible to users onboarding through the embedded signup (opens in a new tab). Then select Messaging as the category and your app will be created.
Navigate to the Dashboard and add WhatsApp by selecting the Set up button underneath it. You will then be redirected to select your business account and accept the Terms of service.
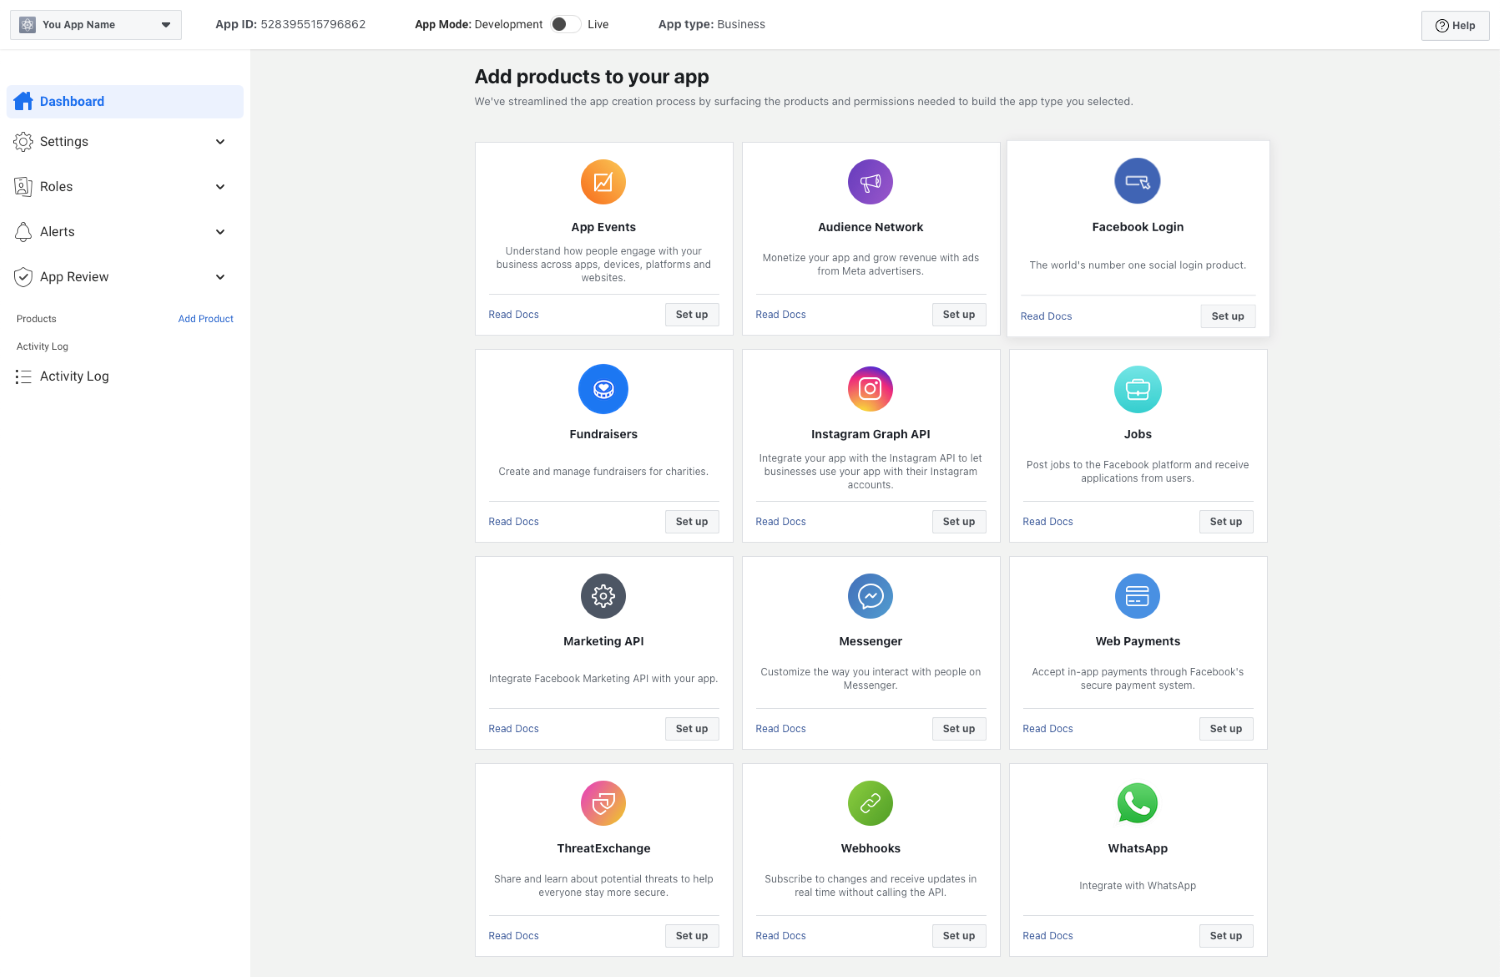
Once you have added the Whatsapp product to your app, you need to accept the Terms of service in order to become a Tech Provider. If you are not automatically redirected to the Quickstart page, follow the steps below:
Navigate to App Dashboard > WhatsApp > Quickstart product panel.
Select Start onboarding.

If you have already added the product to you app, but have not accepted the terms, go back to the Quickstart section to complete this step.
After accepting the Terms of service, you will be redirected to the Quickstart page. To start testing, select Start using the API to open the API setup panel.
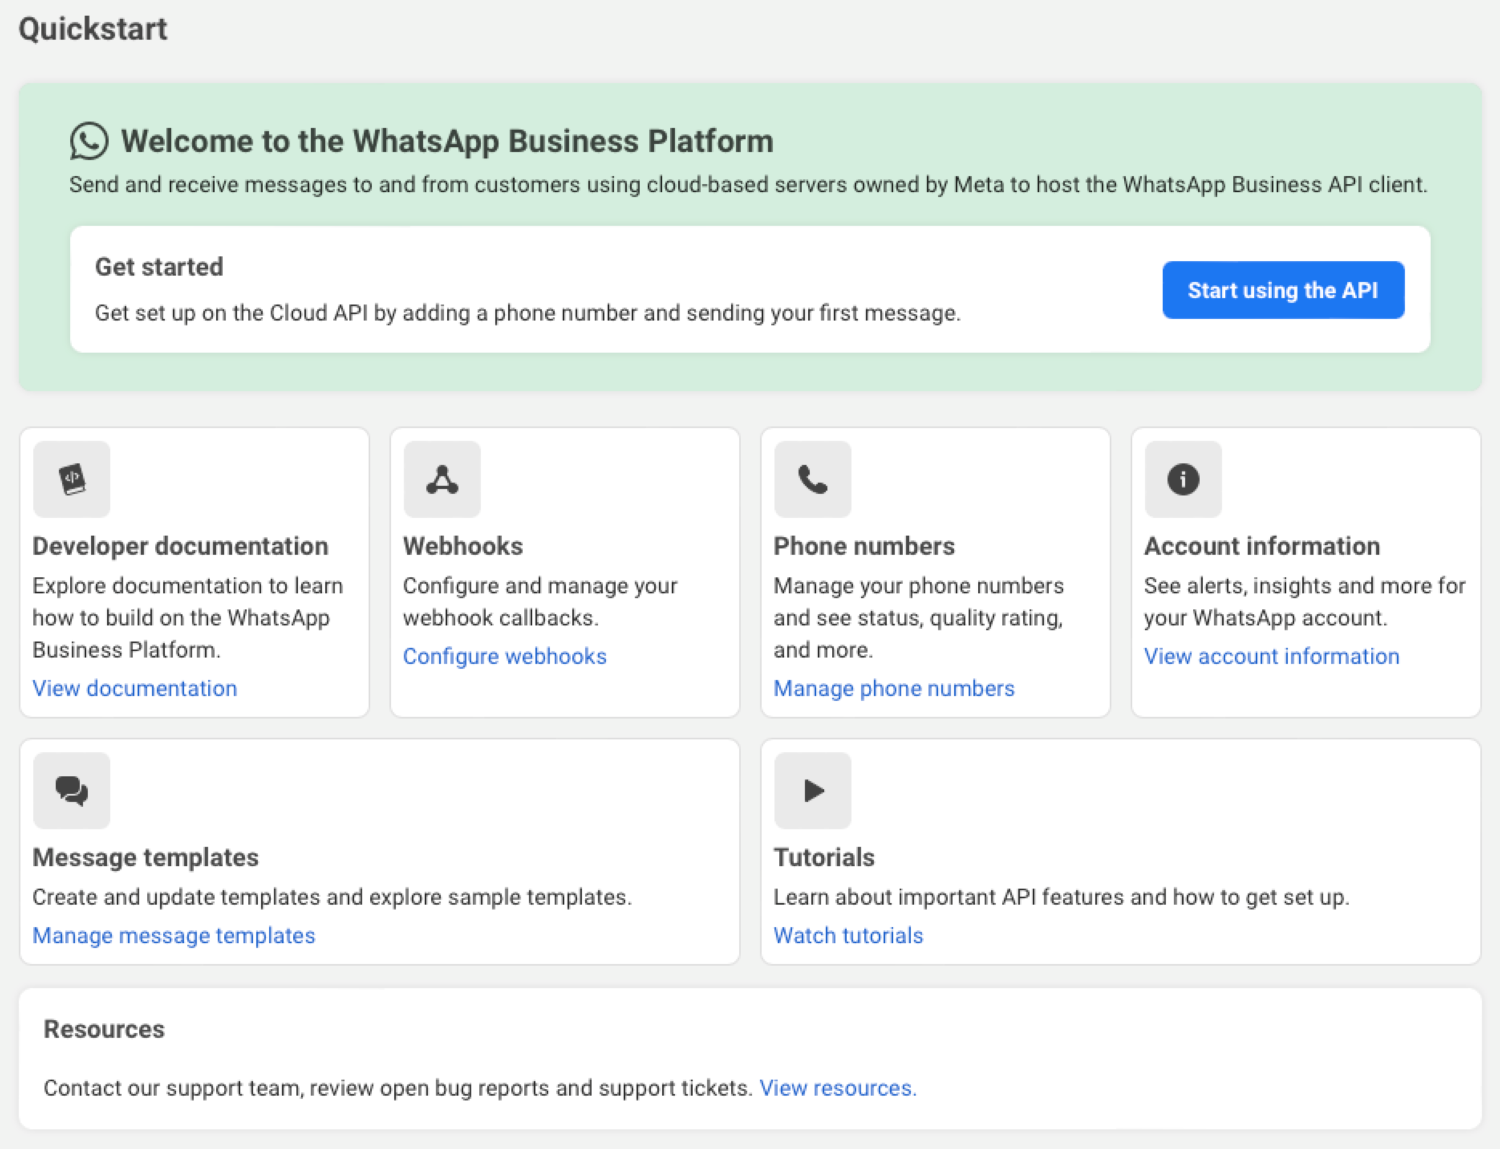
You will get access to a fully-featured sandbox that includes a test phone number starting with a "555" area code to send and receive messages. You can safelist up to 5 numbers in the sandbox environment.
Be sure to add real numbers that are not registered on any WhatsApp products and enable two-step verification (Quickstart > Phone numbers > Manage phone numbers). Otherwise, you will not be able to receive the authentication code.
You will be prompted with a window that allows you to send a WhatsApp message.
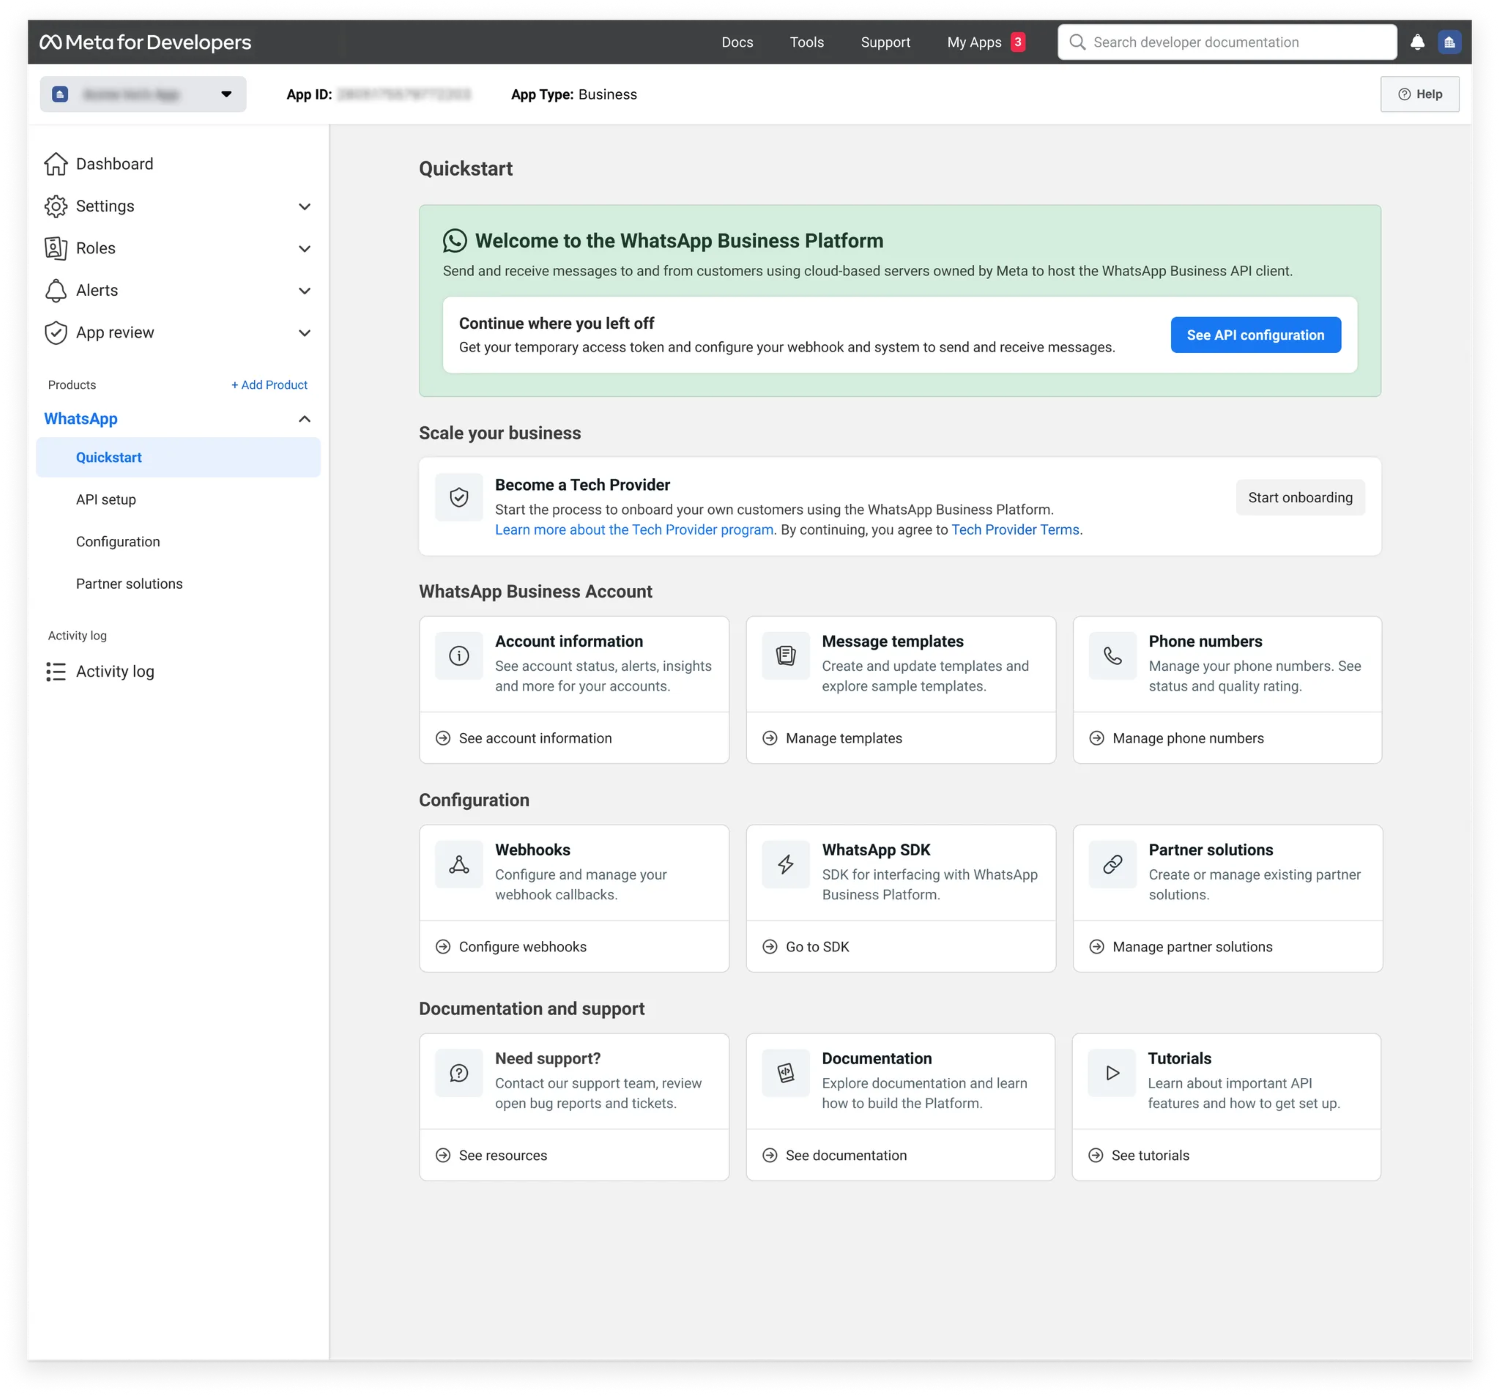
Once you have a WhatsApp integration set up, you can start onboarding your users. On the Quickstart page, select Start onboarding.
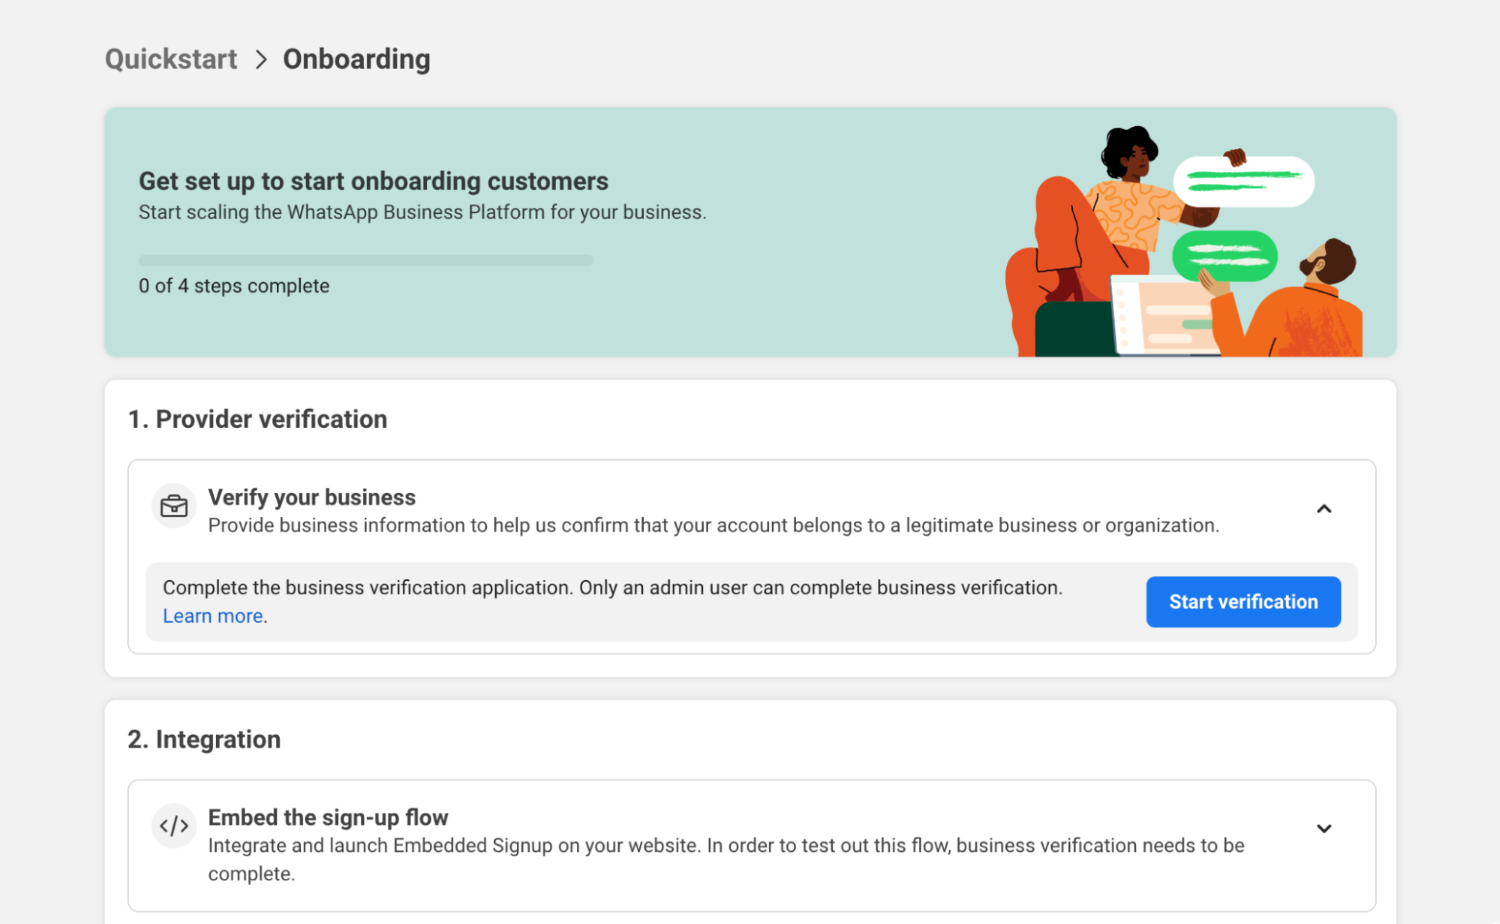
Your business needs to be verified before using the embedded signup (opens in a new tab).
To apply for business verification (opens in a new tab), in the Provider verification step select Start verification. Be sure you upload the required official documents (opens in a new tab) and follow the guidelines on domain verification (opens in a new tab).

During this phase, you can build your end-to-end product experience. Make sure you adhere to the Meta and WhatsApp terms (opens in a new tab) with regards to user data handling when you build your solution.
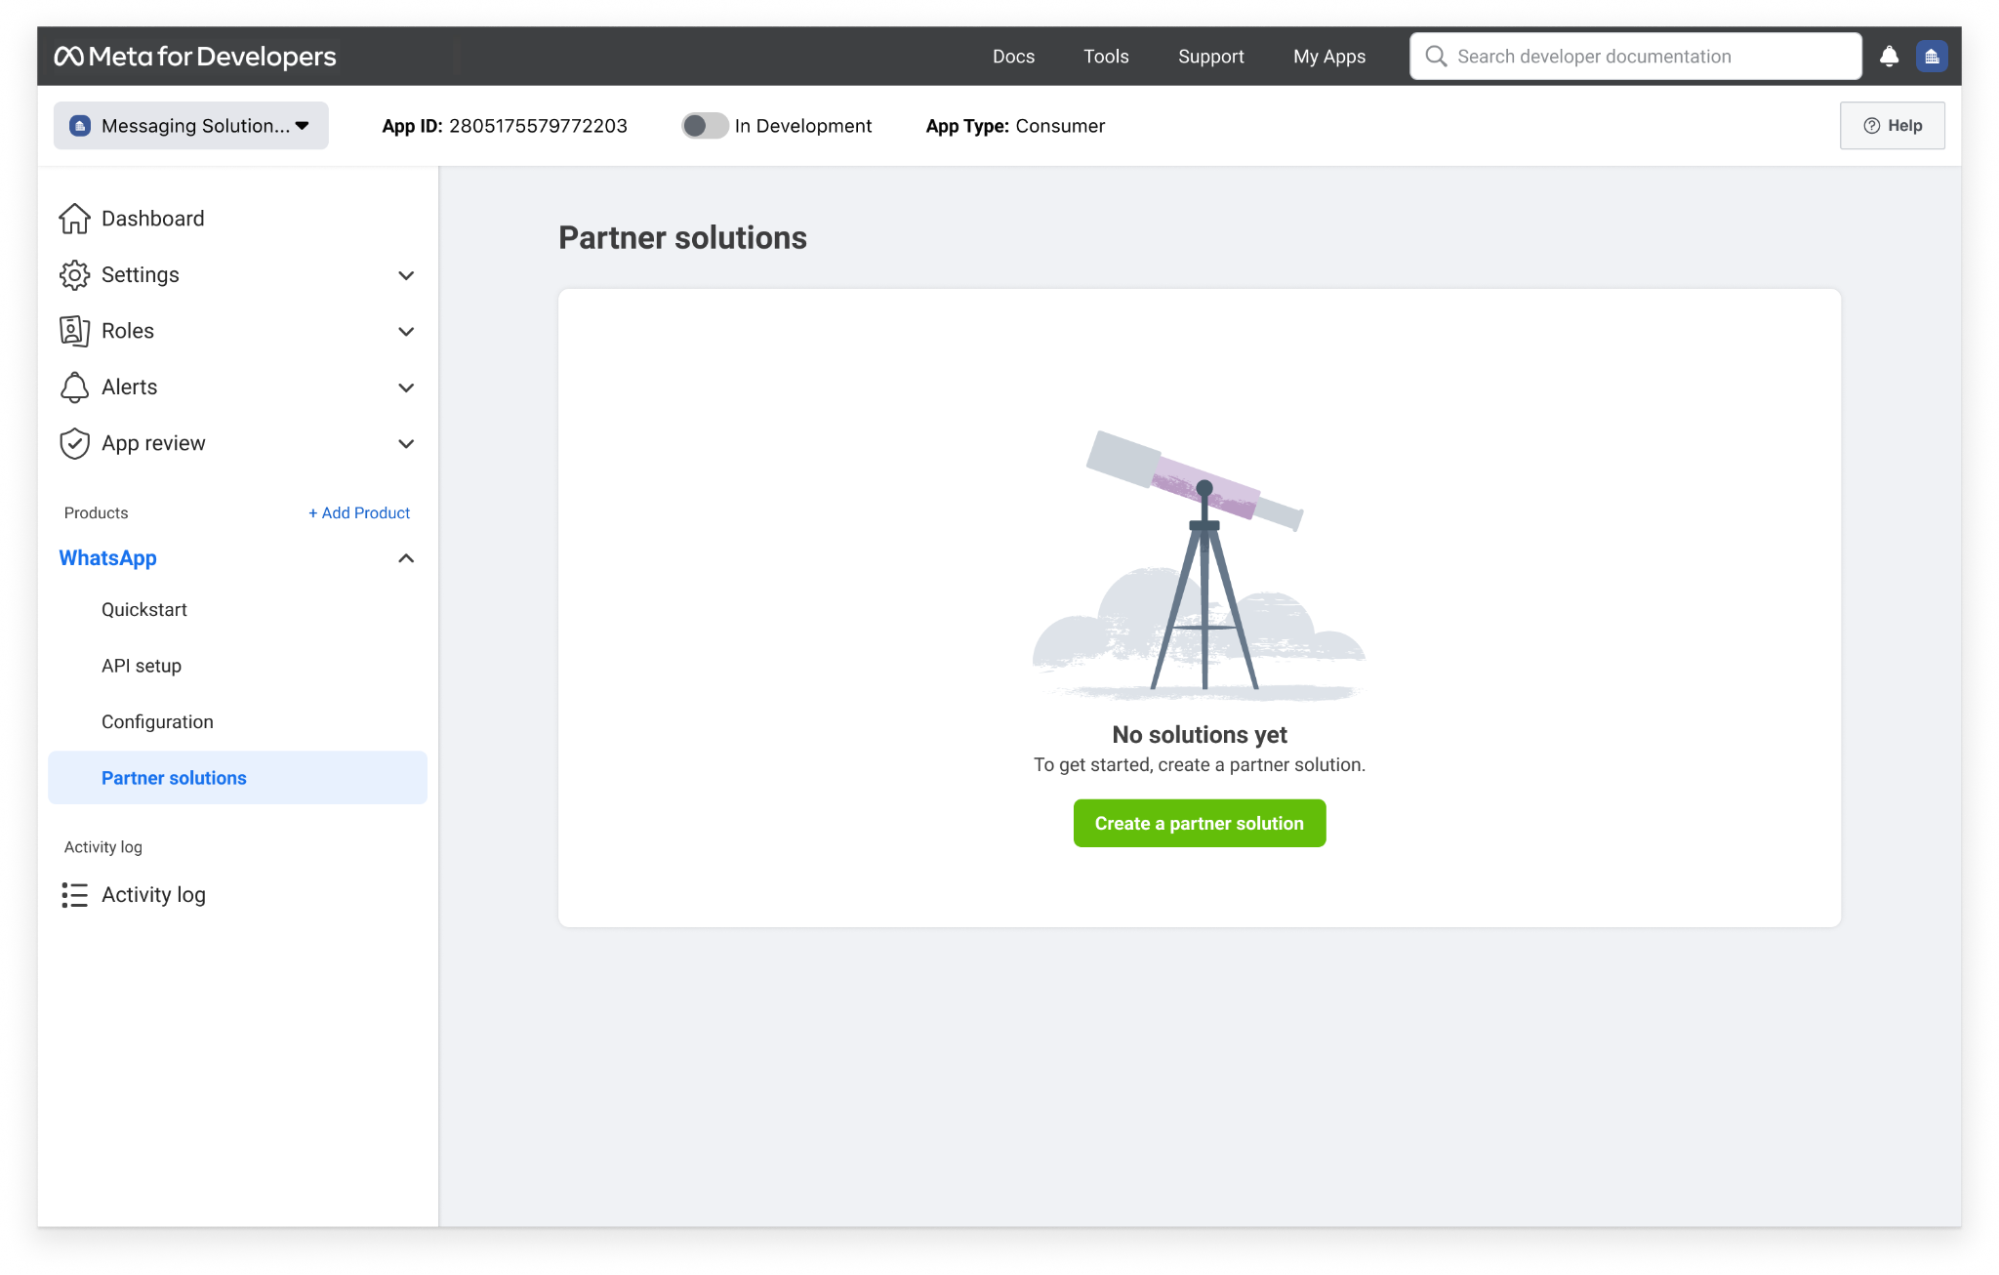
The core of the Tech Provider model is the partner solution, configured in the App Dashboard. This setup defines the WhatsApp assets you and Infobip can access for your end clients. Once approved, the setup allows you to customize the embedded signup process. During this process, your end clients can grant access to these assets for both business entities.
A partner solution establishes an asset-sharing relationship between two business entities. It is configured, initiated, and accepted in the App Dashboard > WhatsApp > Partner solutions panel.
Partner solutions can have the following states:
| State | Description |
|---|---|
| Active | Infobip has accepted the solution and you can use it to configure embedded signup for end client onboarding. |
| Pending | Infobip has not accepted or rejected the solution. End clients who try to access embedded signup configured for a solution in this state will see an error indicating it cannot be used for onboarding. |
| Draft | The solution has been initiated and saved but has not been sent to Infobip. End clients who try to access embedded signup configured for a solution in this state will see an error indicating it cannot be used for onboarding. |
| Inactive | Infobip declined the solution request. End clients who try to access embedded signup configured for a solution in this state will see an error indicating it cannot be used for onboarding. |
| Pending deactivation | Infobip has requested to deactivate the solution. You can accept or decline this request. |
| Deactivated | The solution has been deactivated. End clients who try to access embedded signup configured for a solution in this state will see an error indicating it cannot be used for onboarding. |
You can use each solution to onboard up to 200 end clients in a rolling one week period.
To add the Infobip app to your partner solution, follow these steps:
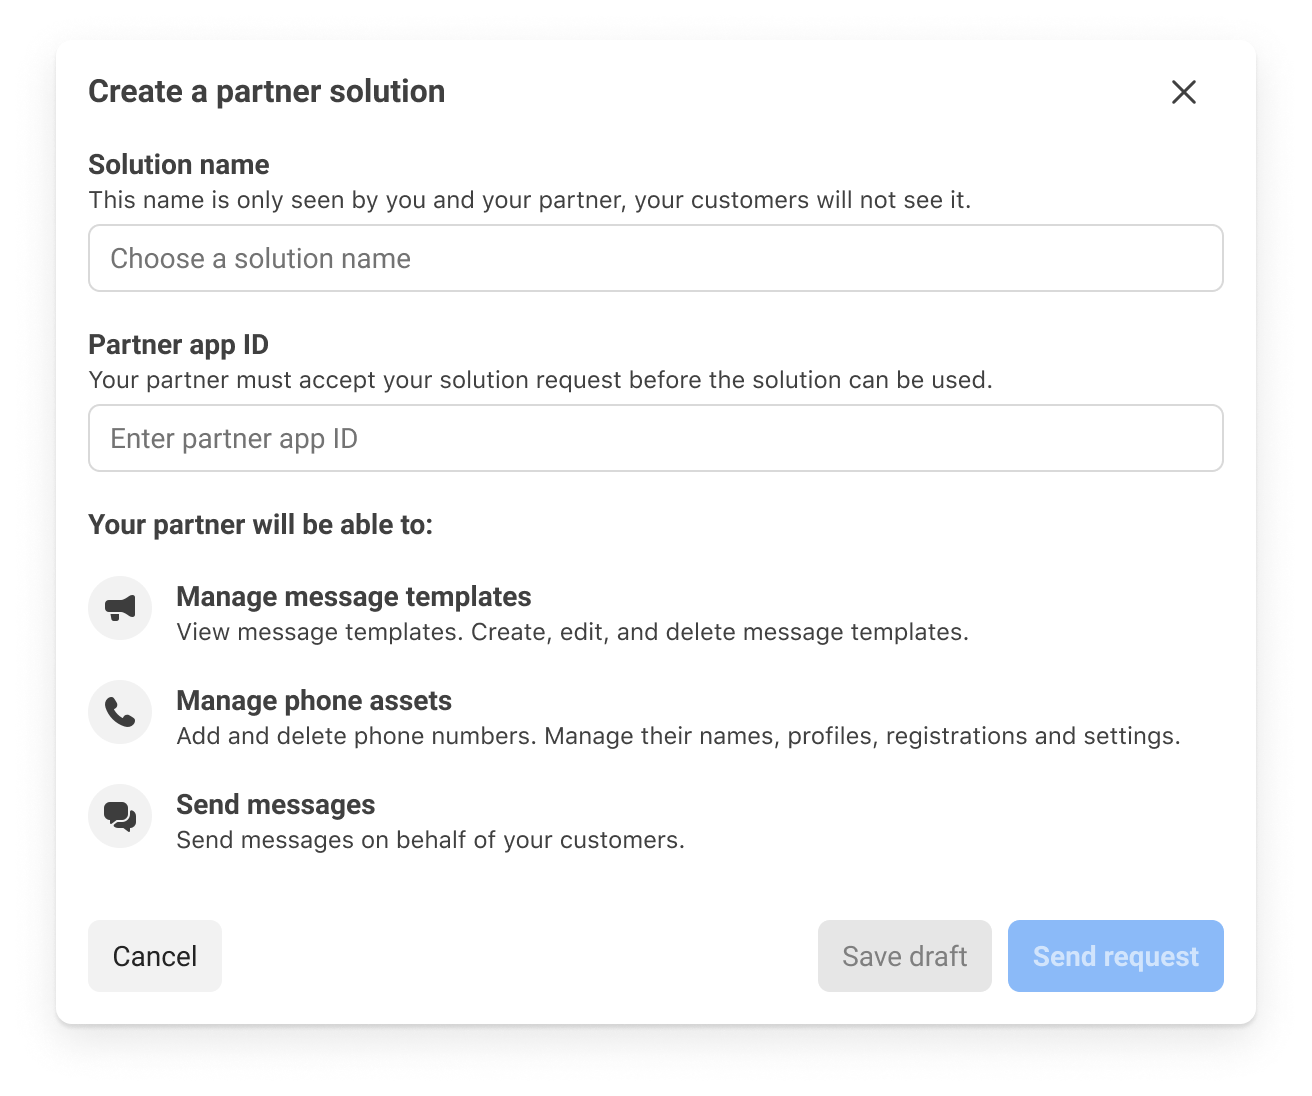
1. Collaborate with Infobip to determine a solution name
Work with Infobip to decide on a solution name that will appear in the WhatsApp > Partner solutions panel in the App Dashboard. This name helps you and Infobip easily identify the solution among others.
2. Initiate a partner solution request
Once you have agreed on the solution name, access the App Dashboard > WhatsApp > Partner solutions.
3. Create a partner solution
4. Enter Infobip app ID
Provide the Infobip app ID: 1370401139746733.
5. Complete the partner solution request
Follow the prompts to complete the process and initiate the partner solution request.
After the partner solution request is complete, Infobip receives and email and notification in Meta Business Suite about your request. The solution appears in the Partner solutions panel with a Pending status until Infobip accepts. it.
When Infobip accepts the partners solution request, the status changes from Pending to Active. Once the status is active, copy the Solution ID and add it during the embedded signup configuration.
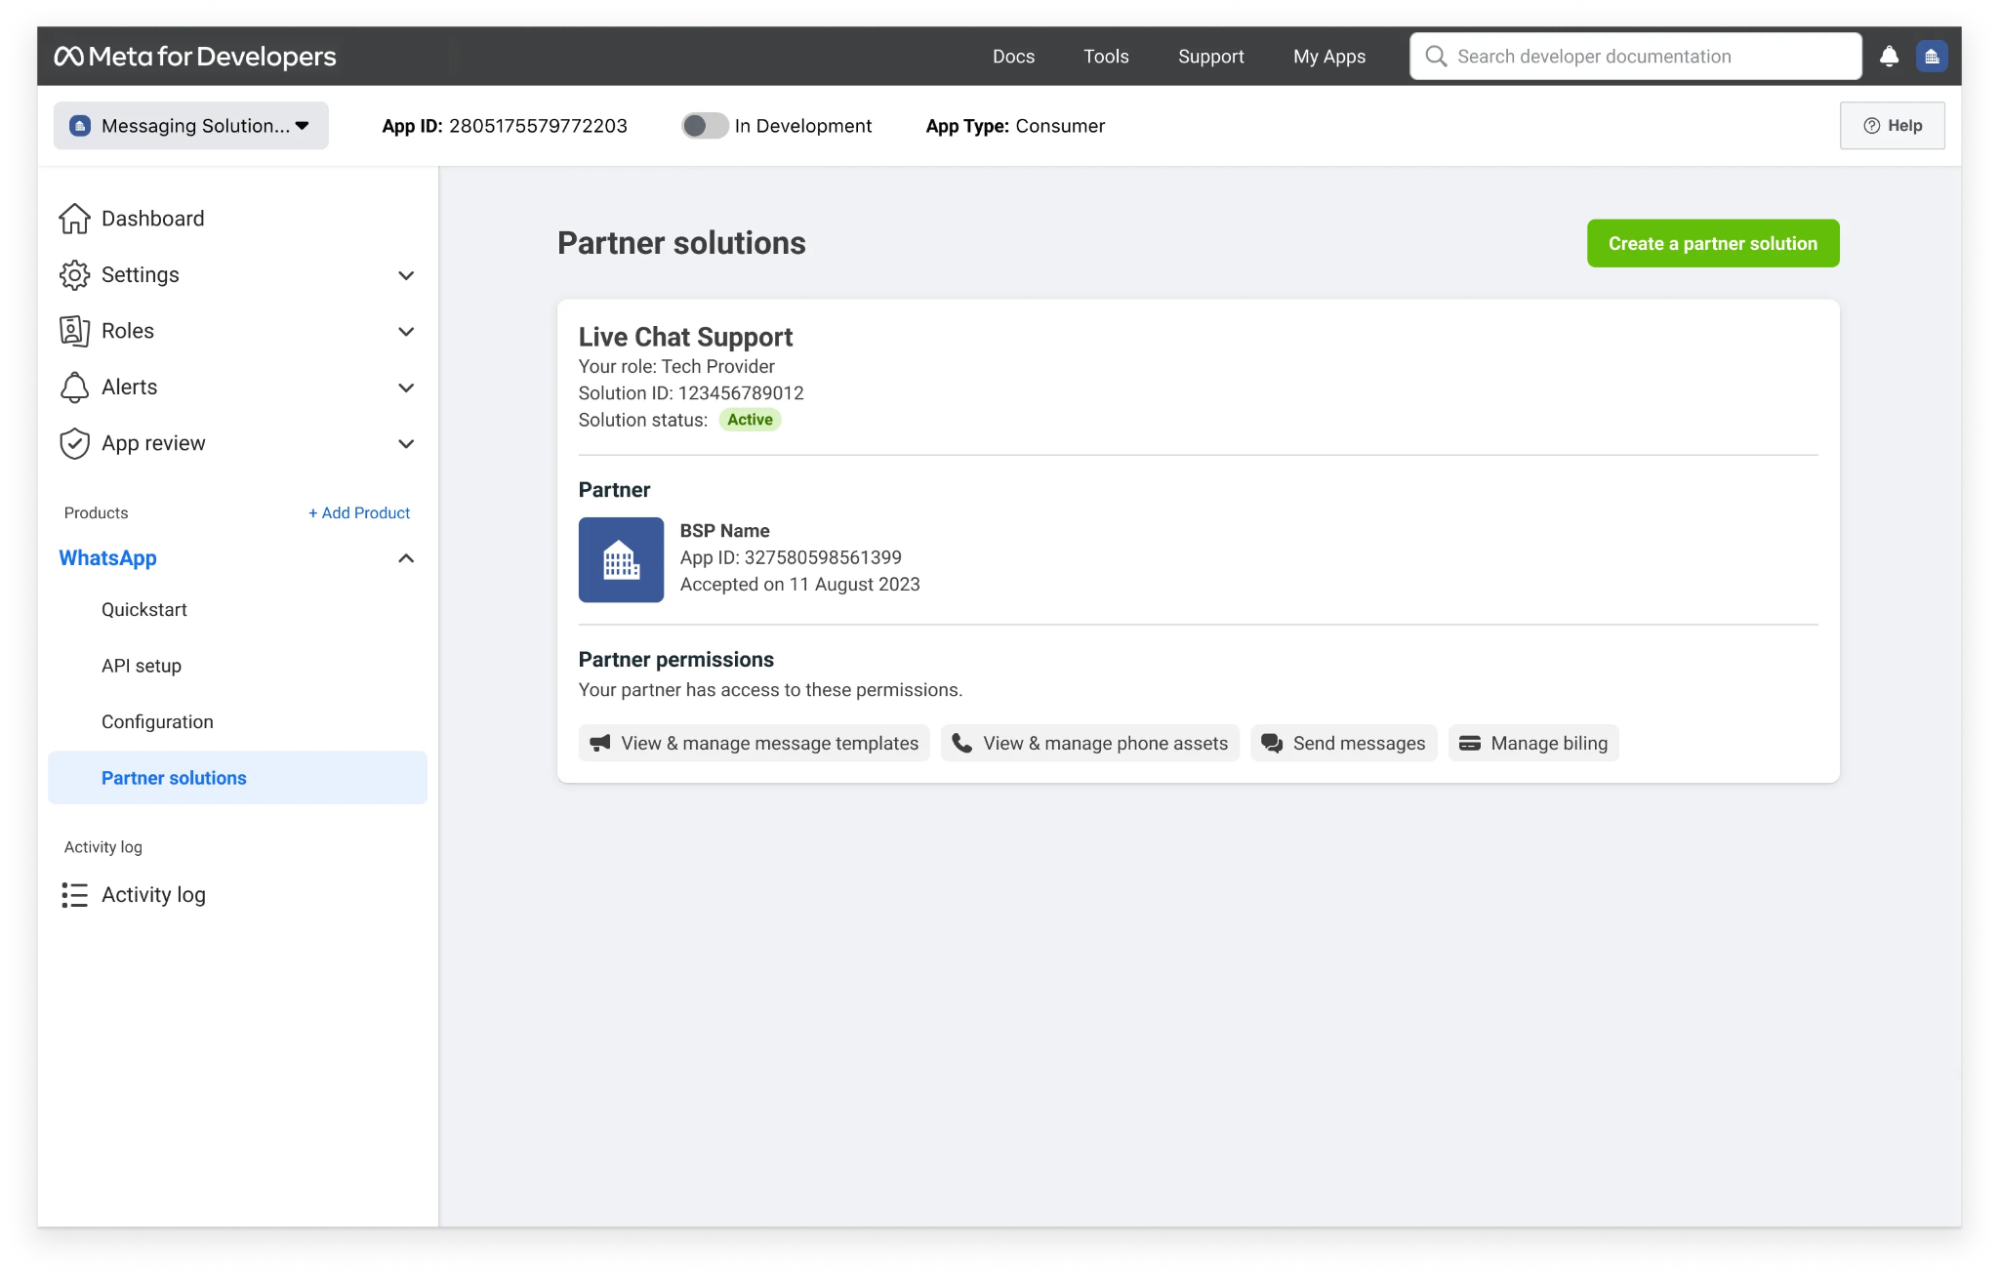
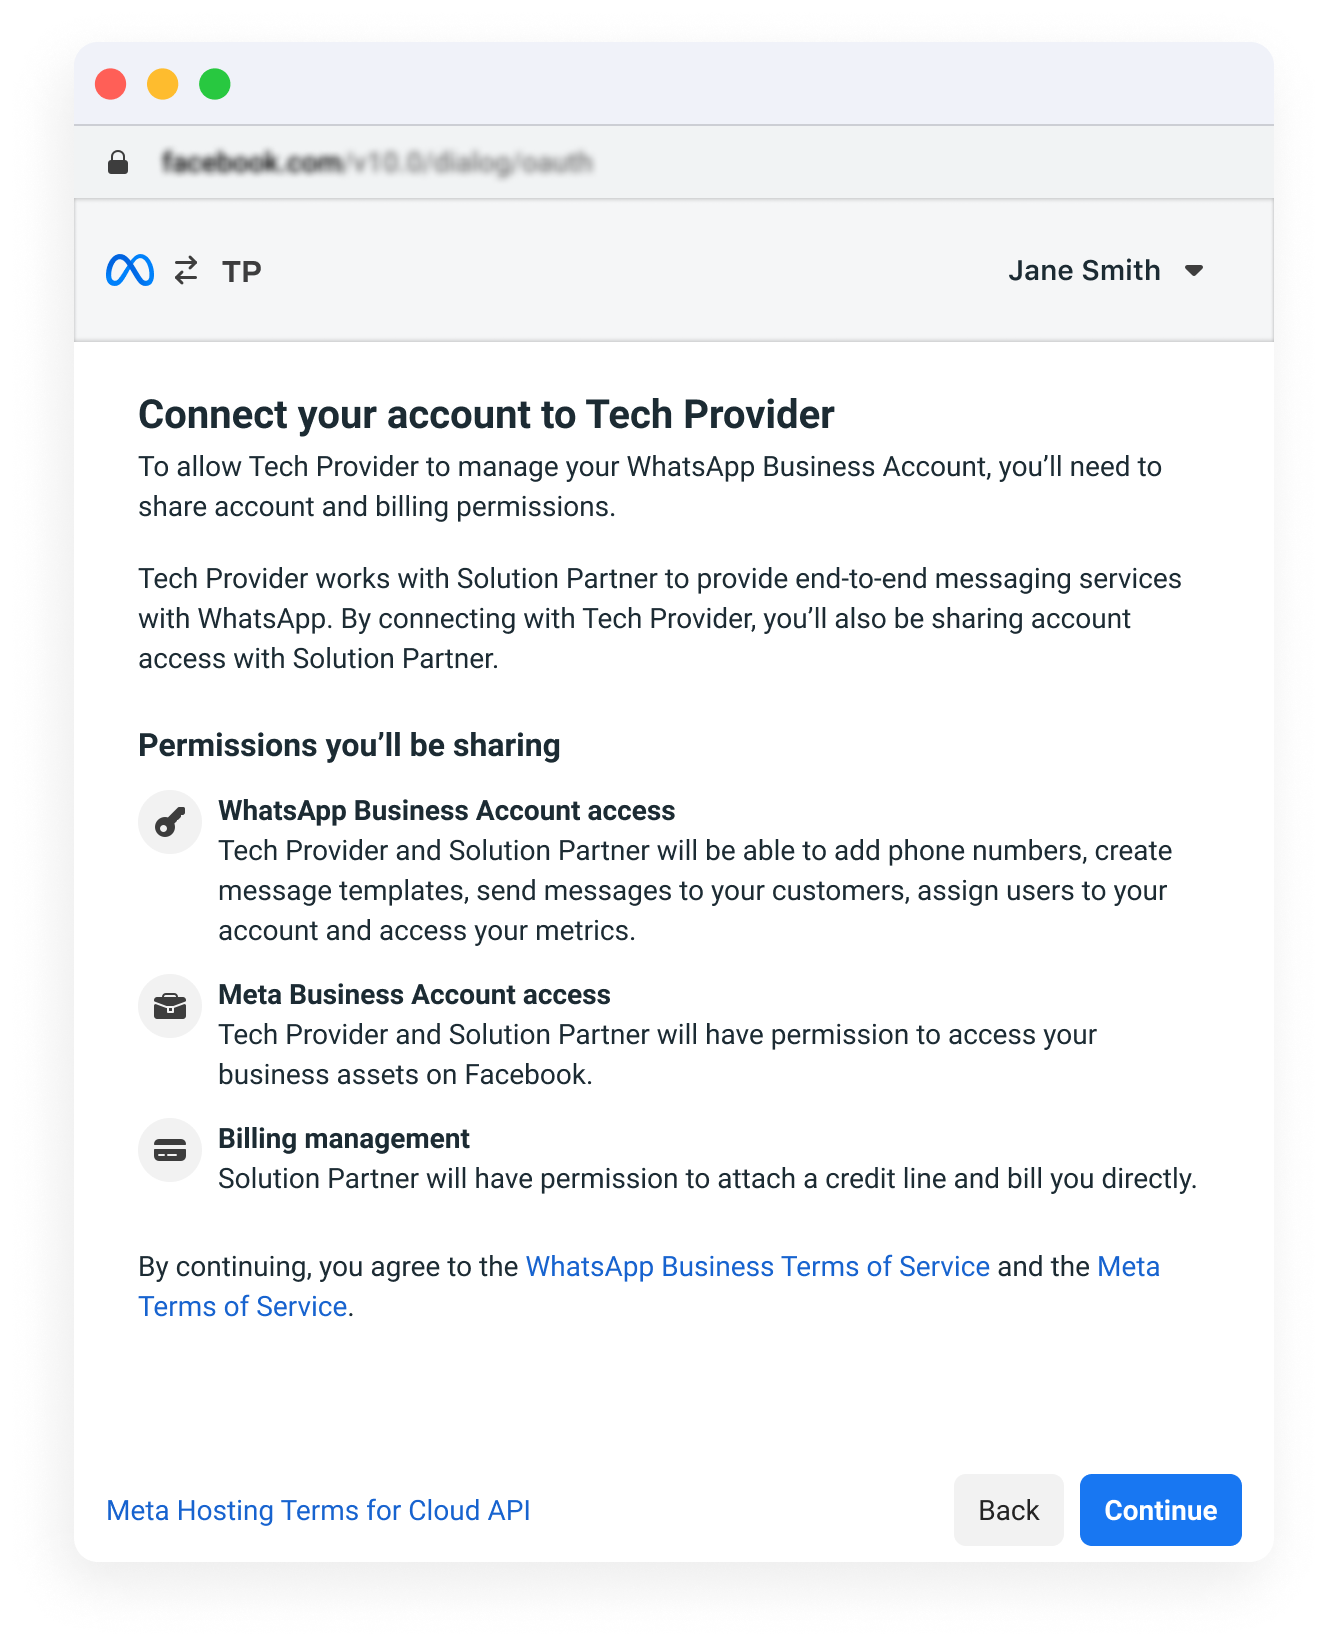
When an end user completes the flow, the required WhatsApp assets are automatically generated, and access to these assets is granted to both you and Infobip.
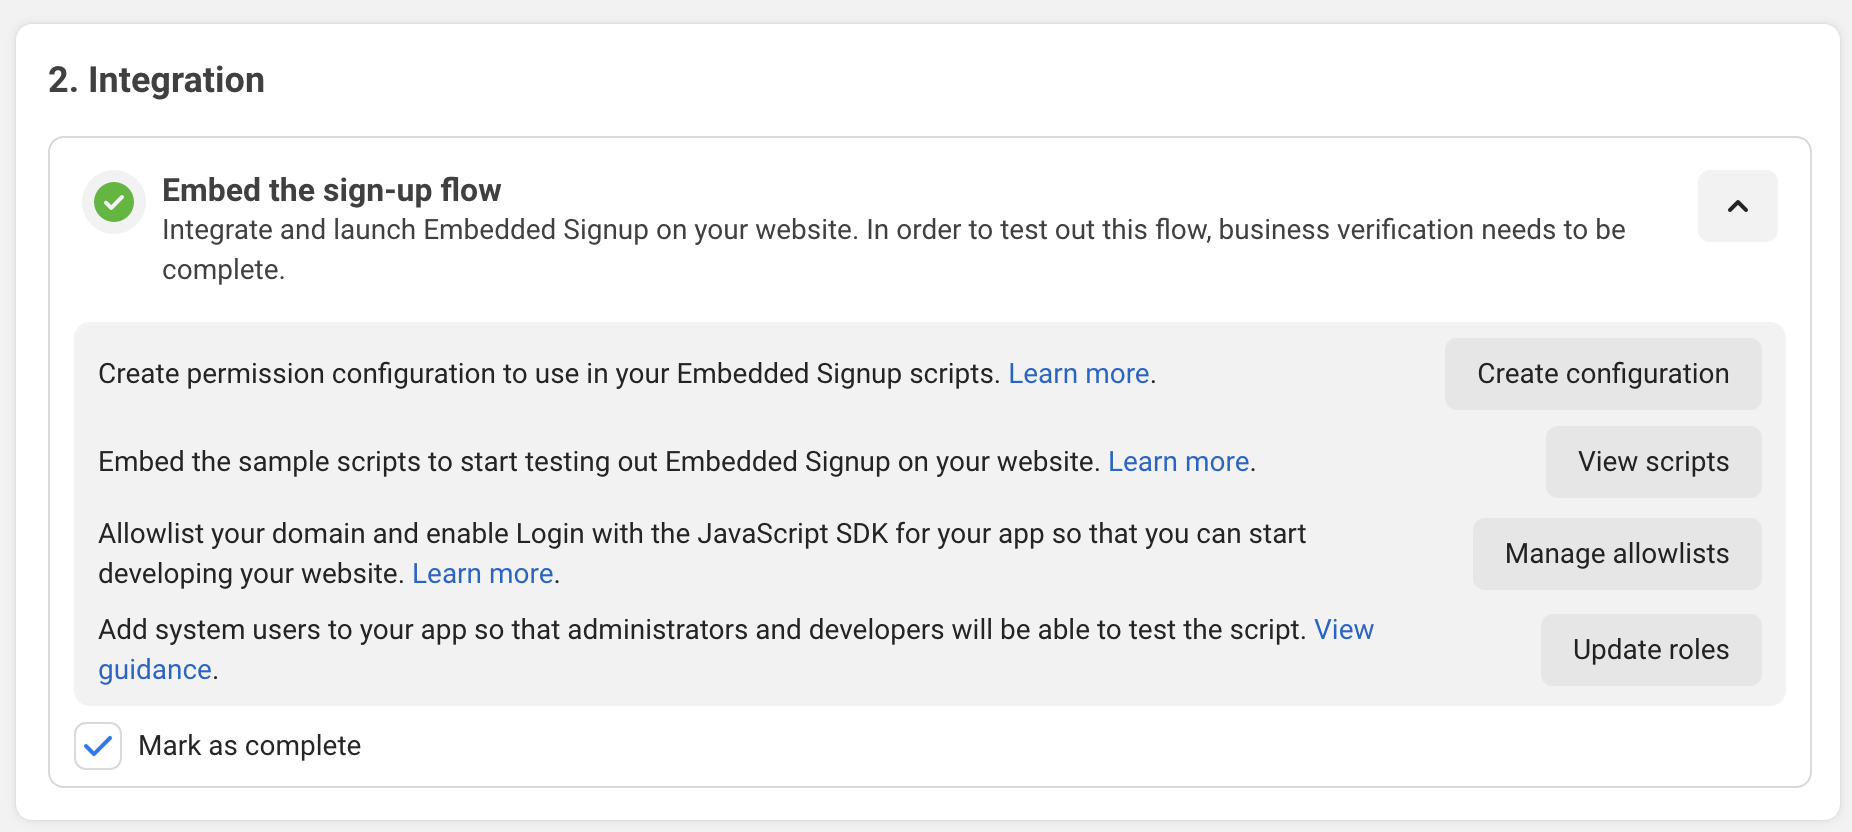
To set up the embedded signup, expand the Integration section. There you can see the steps to access the embedded signup flow.
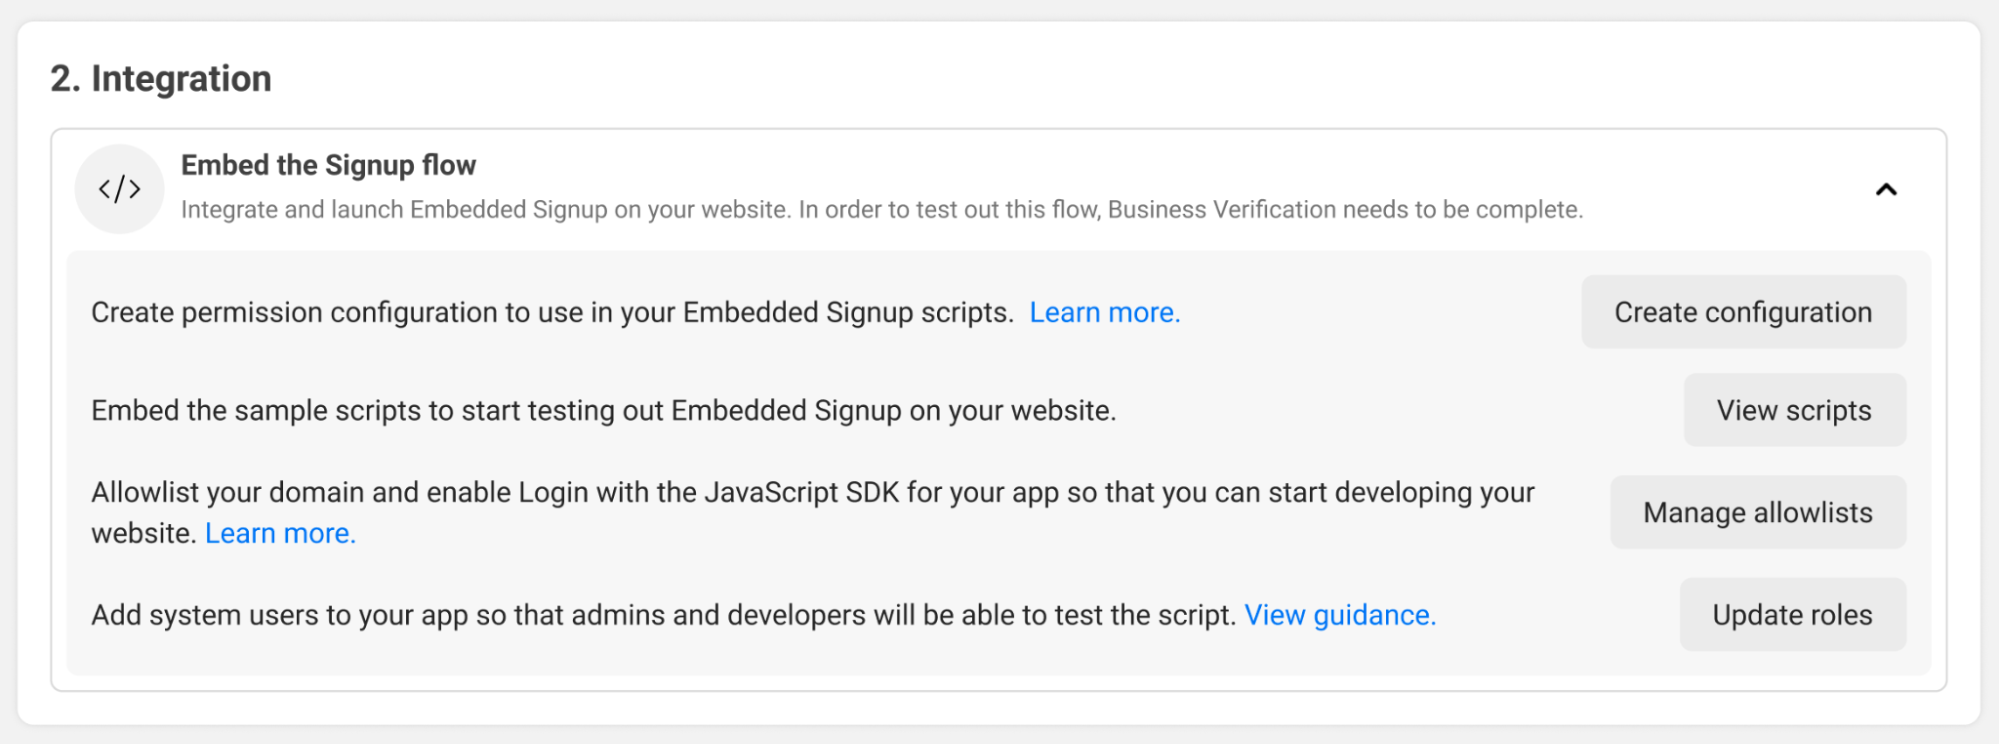
Create configuration
This button shows your Facebook Login for Business permission configuration. If you have not created one yet, go to the Products link on the left side of the App Dashboard and add the Facebook Login for Business product to your app.
View scripts
This button shows the embedded signup code with several pre-filled values, such as your app ID. Make sure to assign your permission configuration ID to the config_id property in the script.
Configure the embedded signup flow
Assign the Solution ID to the solutionID property in the extras.setup object and after configuration, display the embedded signup to end clients on your platform in a suitable location. For example:
<script>
  // Facebook Login with JavaScript SDK
  function launchWhatsAppSignup() {
    // Launch Facebook login
    FB.login(function (response) {
      if (response.authResponse) {
        const accessToken = response.authResponse.accessToken;
        // Use this token to call the debug_token API and get the shared WABA's ID
      } else {
        console.log('User cancelled login or did not fully authorize.');
      }
    }, {
      config_id: '<CONFIG_ID>', // Configuration ID obtained in the previous step goes here
      response_type: 'code',    // Must be set to 'code' for System User access token
      override_default_response_type: true,
      extras: {
        setup: {
          solutionID: '<SOLUTION_ID>' // Solution ID goes here
        }
      }
    });
  }
</script>

<button
  onclick="launchWhatsAppSignup()"
  style="background-color: #1877F2;
         border: 0;
         border-radius: 4px;
         color: #fff;
         cursor: pointer;
         font-family: Helvetica, Arial, sans-serif;
         font-size: 16px;
         font-weight: bold;
         height: 40px;
         padding: 0 24px;">
  Login with Facebook
</button>
Load the Facebook JavaScript SDK
Simplify the sign-up process on your website and allow users to log in with their Facebook account:
<script>
<script>
window.fbAsyncInit = function() {
FB.init({
appId: '790956649742945',
autoLogAppEvents: true,
xfbml: true,
version: 'v20.0'
});
};
</script>
<script async defer crossorigin="anonymous"
src="https://connect.facebook.net/en_US/sdk.js">
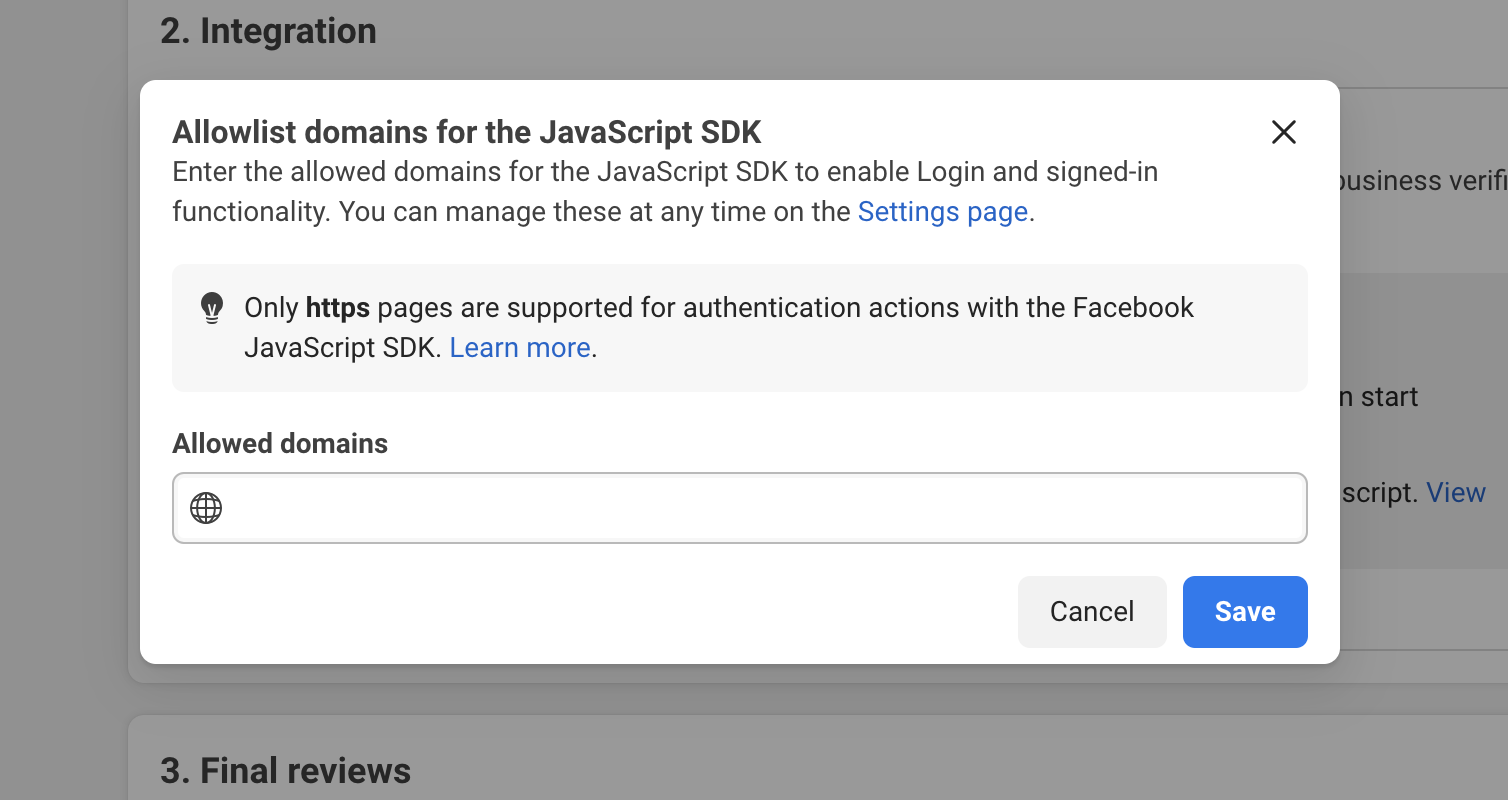
</script>Manage allowlists
Select Manage allowlists and allowlist your domain. You can do this from the Facebook Login settings page as well.
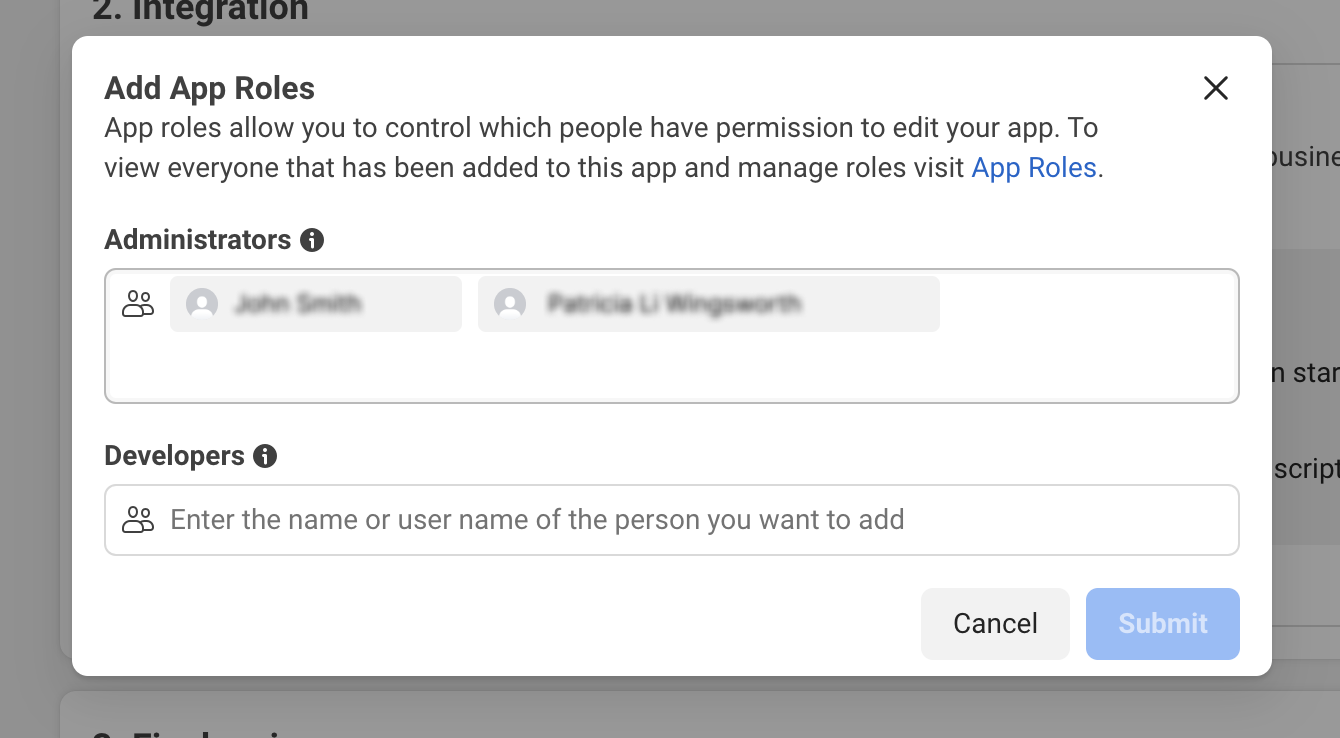
Update roles
Add your developers to your app by selecting Update roles. Avoid assigning admin roles unless absolutely necessary. Once you obtain advanced access on permissions through App review, any user can onboard using your embedded signup flow.
Billing
End clients onboarded through the embedded signup (configured for a partner solution) share Infobip's credit line. Infobip handles billing for any end-client API usage and charges the solution to you. You can bill your clients directly for your value-added solution or service.
Webhook registration event (status update on registration)
Infobip forwards notifications about any account registration changes to your webhook in real time. Status can be IN_PROGRESS, FAILED, or FINISHED. To enable the webhook setup, provide the URL to your Account Manager.
     {
      "businessAccountId": "102384266223093",
      "status": "FINISHED",
      "createdAt": "2023-06-07T15:17:37.444+0000",
      "lastModifiedAt": "2023-08-28T17:01:04.904+0000",
      "senders": [
        {
          "phoneNumberId": "122098754222007518",
          "displayPhoneNumber": "+1 313-513-8538",
          "type": "CLOUD",
          "status": "FINISHED"
        },
        {
          "phoneNumberId": "119302867930080",
          "displayPhoneNumber": "+1 213-218-6042",
          "type": "CLOUD",
          "status": "FAILED"
        }
      ]
    }
Automatic resource association
The system can automatically associate WhatsApp resources with an application ID and entity ID during the WhatsApp sender registration through the embedded signup flow. This feature links WhatsApp resources to the correct application and entity IDs as they are created, simplifying the management of multiple customer accounts. For example, when a Tech Provider receives a subscriptions event with a default entity ID, they can quickly assign the appropriate entity and application IDs for a new customer, ensuring smooth onboarding and efficient resource allocation.
The system will automatically assign the entity ID to match the end user's Business Manager ID received from the registration event. Users can modify the entity IDs afterward if necessary.
curl -X POST 'https://api.multimediaaplicada.com.mx.com/whatsapp/1/embedded-signup/registrations/account/shared' \
--header 'Authorization: App API_TOKEN' \
--header 'Content-Type: Application/json' \
--data '{
    "techProviderId": "techProviderId"
}'WhatsApp standalone API
When you send a WhatsApp message to an end user's device, you are sending an outbound message. There are several types of WhatsApp messages:
When an end user sends a WhatsApp message from their device to your phone number, it is an inbound message. The inbound message is routed through the Infobip platform and delivered to you. Common actions with inbound messages include:
Learn more about integrating outbound and inbound WhatsApp traffic (opens in a new tab).
Service management
Effective service management for WhatsApp business solution involves maintaining seamless communication and engagement. Key aspects include:
Implementing robust service management practices ensures compliance, reliability, and optimal performance, leading to better customer interactions on the WhatsApp business solution platform.
Learn more about WhatsApp business solution service management (opens in a new tab).
Message status reports
Message status reports provide insights into the delivery and engagement of messages in WhatsApp business solution management:
Effective management of these reports involves capturing, processing, and interpreting data from Infobip APIs, allowing businesses to monitor message effectiveness and refine their communication strategies.
Messages API
WhatsApp outbound and inbound traffic can also be managed through the Messages API, which integrates multiple messaging channels into a single interface. Instead of using separate APIs for each channels, you can manage all channels with one API.
Find more information in the Messages API product documentation (opens in a new tab) and API details (opens in a new tab) page.
CPaaS X
CPaaS X offers modular and flexible APIs that speed up onboarding, reduce operational load, minimize engineering effort, and accelerate time to market.
Discover how CPaaS X can help reduce your workload (opens in a new tab).
Once you have set up the embedded signup, ensure it is accessible on your website, where you can test it. To test embedded signup, simulate a customer completing the flow using test business credentials generated from your platform. To validate that your embedded signup setup is correct, confirm the following:
After completing these steps, go to the Meta App's Quickstart > Onboarding > Integration section and select the checkbox for Mark as complete.
At this stage of the implementation (app not reviewed yet), you can only onboard test accounts through the embedded signup solution. The WhatsApp business account (WABA) you create for testing cannot be associated with your Tech Provider's Facebook Business Manages. You must create a new Business Manager account using the embedded signup.
To successfully create a test WABA, the person performing the setup must have admin right on both the newly created Business Manager account (admin rights are automatically assigned upon creation) and the Tech Provider Business Manager account. This limitation does not apply to production environments.
Starting in 2023, your business must go through business verification and be verified in order to complete app review.
The app review (opens in a new tab) is a required step for allowing apps to access specific features on WhatsApp. Since your app will manage another business's WhatsApp business account and send messages on their behalf, Meta needs to validate how you intend to use the requested permissions to ensure there is no abuse or harm to user data. Meta's operational team will review the submission and approve, reject, or request additional information.
To prepare for the app review, follow the steps below:
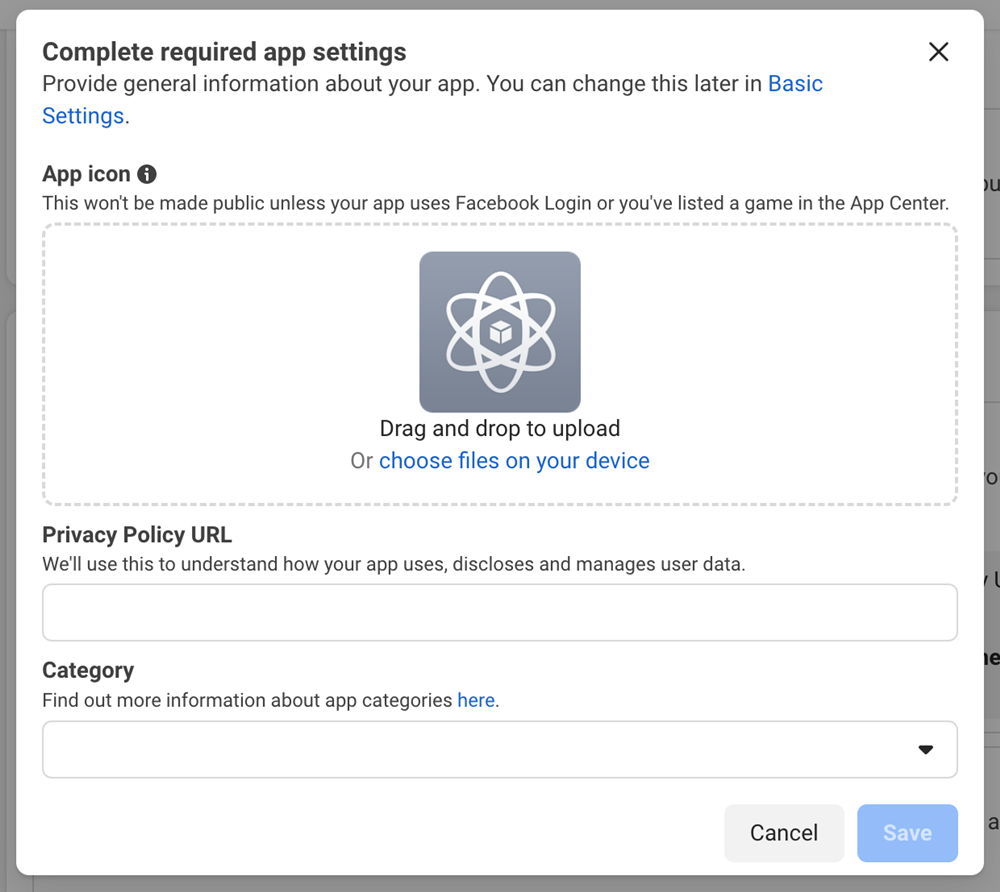
Select Review app settings to ensure that your app icon, privacy policy URL and app category are correctly set.
Build your prototype and make sure you adhere to the Meta and WhatsApp terms (opens in a new tab). Your website can subscribe to webhooks to receive updates on a WhatsApp Business Account of your user.
Permissions are granular, user-granted authorizations. Before your app can use a service to access an app user's data, the user must grant all permissions required by that service. To pass the app review, request only the permissions necessary for your app to function, as asking for unnecessary permissions is a common reason for rejection.
Below are the app permissions required during the review process of the WhatsApp Business Solution.. Submit a separate video for each permission, highlighting where the respective permissions are used. Ensure your video submissions showcase your product (website or mock-ups) and not Infobip or Meta products.
whatsapp_business_management
whatsapp_business_messaging
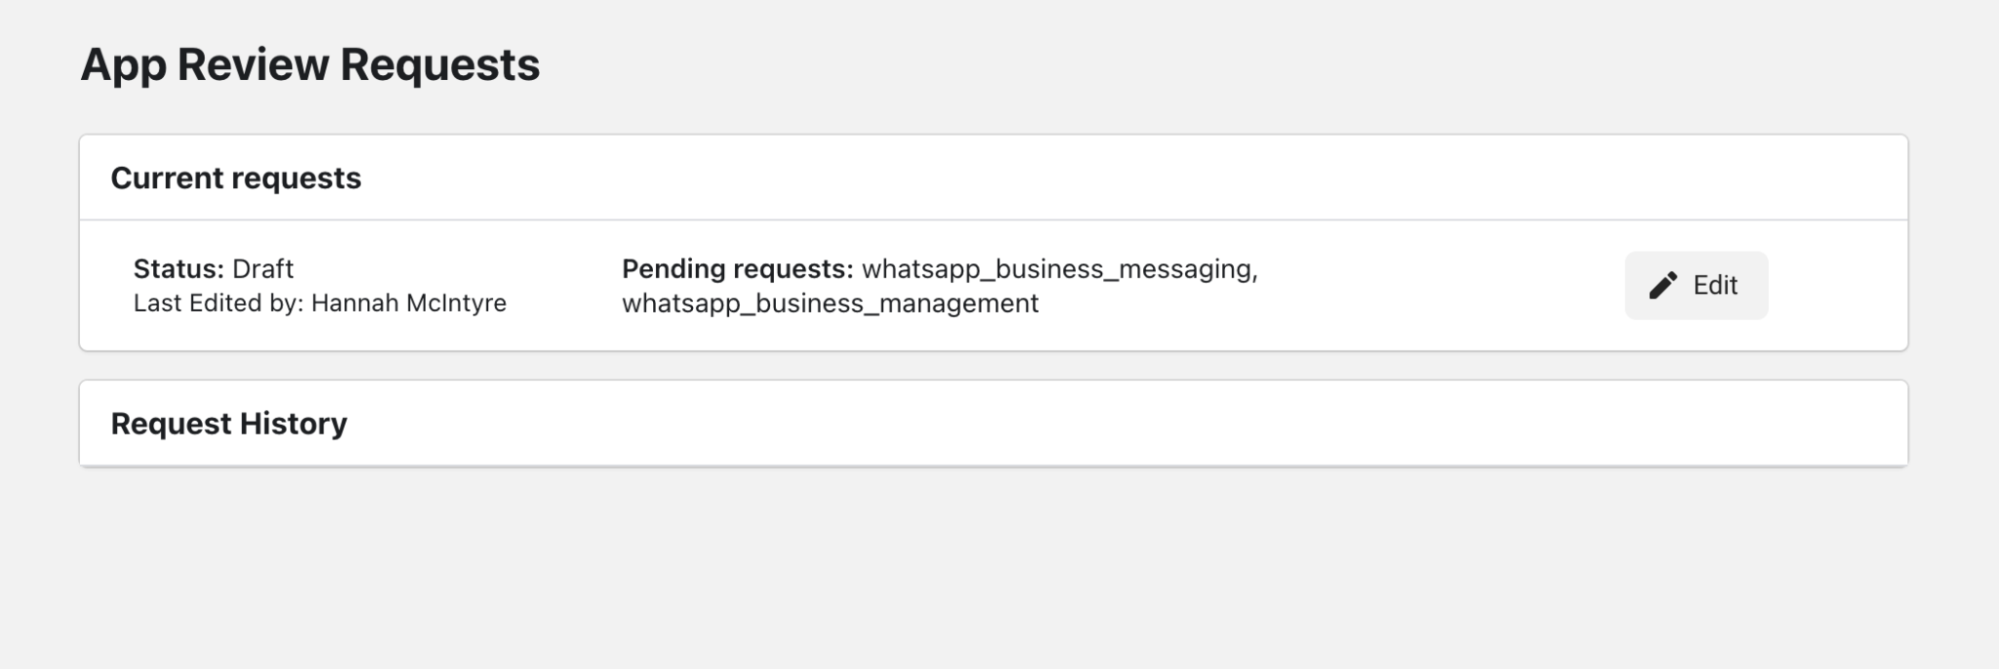
You can start the app review process in the App Dashboard. This step is crucial to ensure your app complies with the requirements set by Meta and WhatsApp.
Follow the steps below to initiate the review:
In the App Dashboard (opens in a new tab), navigate to WhatsApp > Quickstart.
Select Continue onboarding > Begin app review.
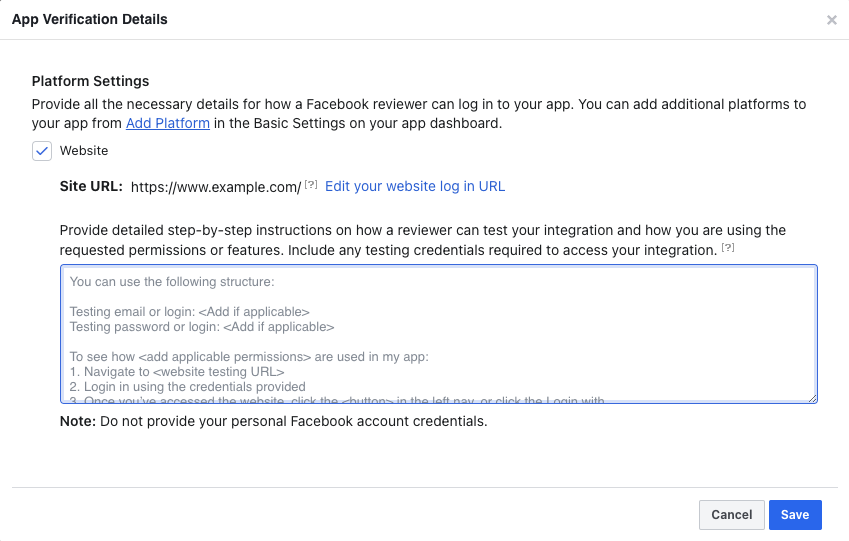
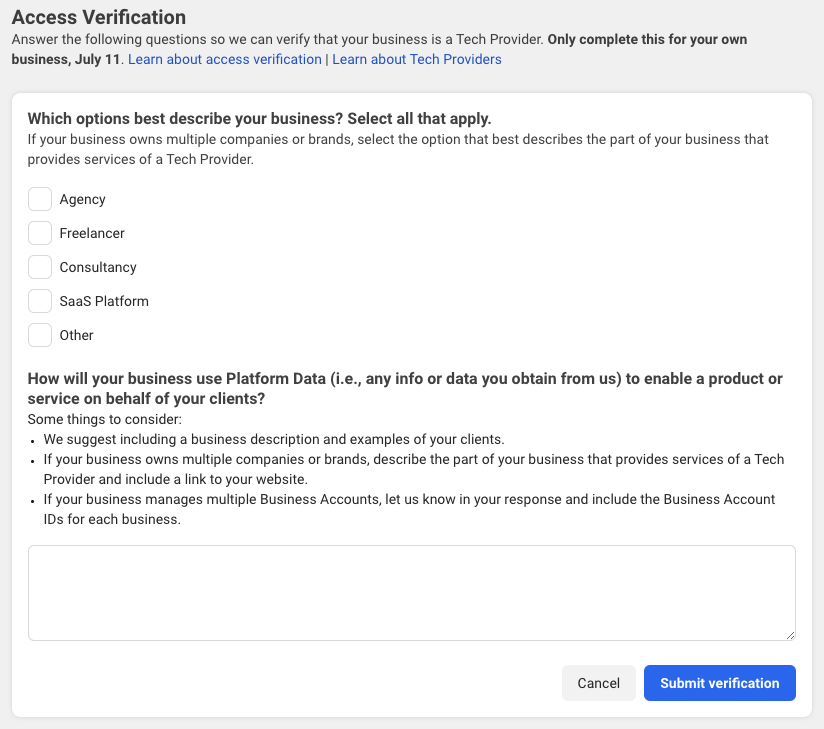
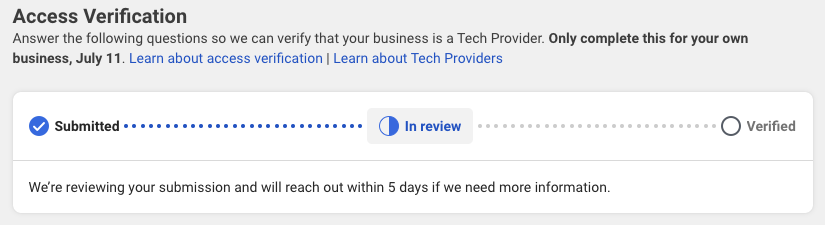
To ensure that only businesses with legitimate use cases can access data belonging to other businesses, you must complete the access verification process. You can start access verification after applying for advanced permissions on your app.
To begin, click Start verification. This will open the full access verification page within the WhatsApp product, allowing you to quickly return to the onboarding page when completed.
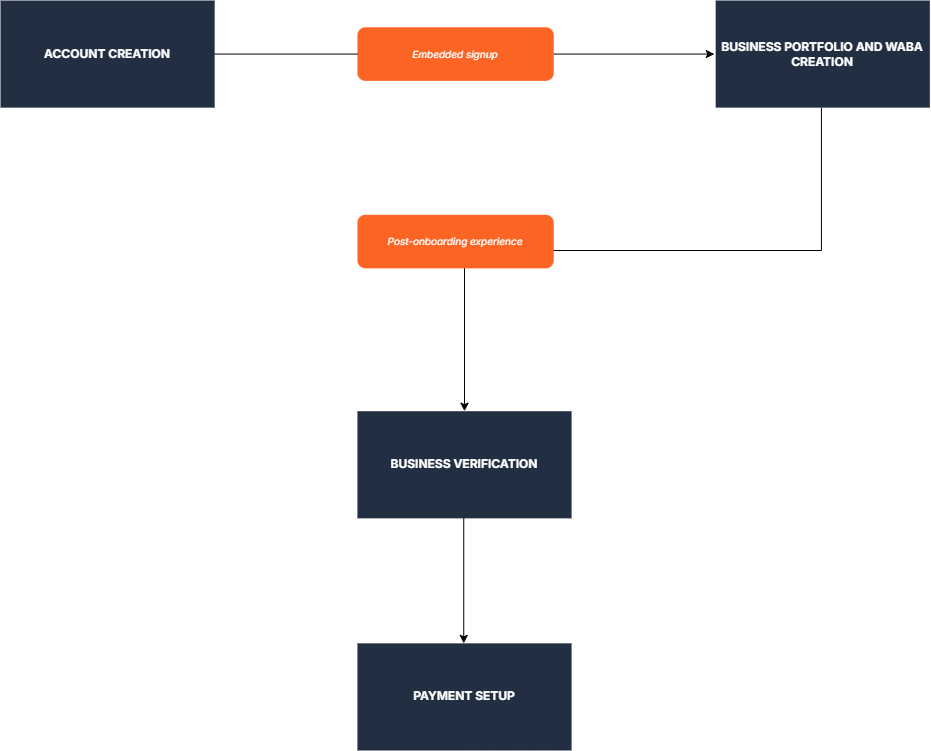
Create an account as a Tech Provider: Users will create an account for your product, allowing you to track and store integration information for their businesses.
Create business portfolio through the embedded signup: Users log in with Facebook through the embedded signup flow to create a portfolio and a WhatsApp Business Account (WABA).
Post-onboarding experience: After users finish the flow, create a post-boarding experience that allows them to take further actions to start WhatsApp messaging.
Business verification: Guide your users through the business verification process, which is required for their business to operate on the platform.
Payments setup: Users must pay Meta directly and add a payment method to their WABA. This can be done by following the steps below:
By default, you can onboard up to 10 new customers within a rolling 7-day window. If you complete the business verification, app review and access verification, your limit will automatically increase to 200 new customers within the same timeframe.
You can check your limit by navigating to the WhatsApp Manager > Partner overview portal. You will also receive and email notification if you are approaching this limit.
If you need to onboard more that 200 customers per week, you can apply to become a Meta Business Partner (opens in a new tab) or submit a Direct Support (opens in a new tab) ticket to Meta.
To access Meta's Direct Support, you must complete the business verification process and then follow the steps below:
